Archive for the Photography Category

Elaina’s First Birthday and Baptism

Posted in Photography with tags , , , , , on October 28, 2009 by craigproulx

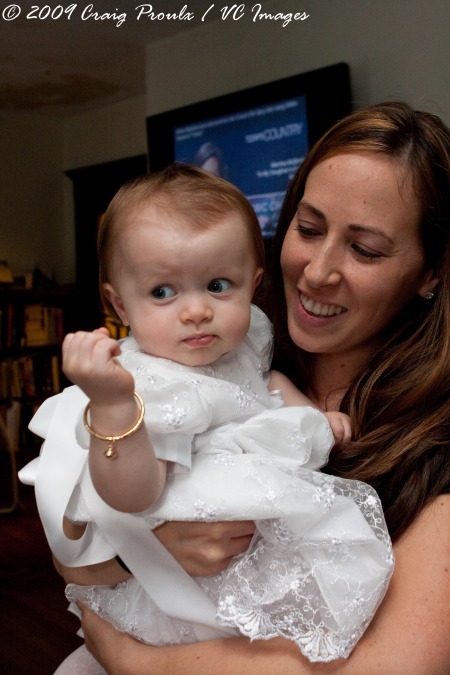
6827-blogIt’s seems like yesterday, when I first photographed little Elaina.  I couldn’t believe it was already a year, when her parents asked me cover her 1st birthday and baptism.  This kid is so photogentic.  She loves getting right up to the camera.  Congratulations Kelly and Dave for a healthy and happy 1st year!  The party was great, with the added bonus of a banana bread cake!  When it comes to desserts I am a sucker. 

On the photography  end of things, I have been taking a great liking to the Gary Fong lightsphere.  It seems to work wonders when bounced off ceilings, and the nice thing is you get that fill light from the front as well.  So far it was worked excellent for me.  I have used it on one wedding and a bunch of portraits.  I will give it a test with a live music shoot this Friday. 

Enough with the rambling, here are some of my favorites from the day:

7005-blog

She was full of expressions

6834-blog

Mother and daughter

6960-blog

Playing with daddy!

6948-blog

This was the most impressive cupcake/yoodle display I have ever seen!

6926-blog

Fixing her braclet

6912-blog

Those are some small shoes!

6914-blog

The baby looking at a photobook of herself with family.

6905-blog

A bachelor's of baptism!

6858-blog

Sharing a moment with grandma


7084-blog

"I am gonna huff, and puff..."


7027-blog

My personal favorite of the day!

Hummingbird Studio!

Posted in Behind The Scenes, Personal, Photography with tags , , , , , , , , on October 14, 2009 by craigproulx

20090815-hummingbirdpanosetup, originally uploaded by craig.proulx.

I recently got the chance to setup and play with the hummingbird studio I have test out all summer. With the help of my father, we had a pivoting bracket madeup by a local metal shop. The beauty of the bracket is that it is fully adjustable! You can use it in many different ways, even as a macro light directly affixed to a camera body! I hate being stingy on info, but I don’t want to give away the details just yet, as he might decide to patten and market it in the near future! The studio itself is basically a bunch of speedlights (580ex, old 550’s, 540ez’s) setup in front of our muslim aka little piece of foamcore clamped to the side of a gazebo where there is a feeder setup. People think we are crazy for having over 12 flashes between the two of us, but surprisingly, you can find these perfectly older units that have been slightly used or sometimes even brand new for very cheap money. In most cases you don’t need to concern yourself with TTL because the best way to do a lot of this strobist stuff is on manual anyway. These older flashes, while they may not have the latest and greatest technology, can still act as slaves from masters such as 550’s or 580’s. We chose to use a 3 way sync cord, in comination with the wireless feature for this setup. As you can see, two of the flashes have battery packs, which are nothing more than 8 additional AA’s connected to the flash. It greatly increase the recycle time, and I swear by these things when doing weddings! For those of you wondering about the batteries themsleves, please note that I am relatively new to the rechargable battery world. However, I have been successfully using the duracell NI-MI AA’s and have no issues. You want to make sure you buy the pre-charged ones, though, because there are two different types of rechargables. One is a slow discharge and one is a fast discharge. In a nutshell, one type will stay charged for months at a time when not being used, while another type will only last a week or so before draining down. I found out the hard way, but luckily not on a paid job! The reason now for all those flashes is to freeze motion. I have to admit that I am not completely satisfied with my photos, but a lot is due to the fact that I believe I had some stray ambien light in the frame, that I failed to notice. These flashes have something that higher powered studio lights don’t…shorter flash durations! In fact, when I added an alien bee 800 to the background, the longer duration of the alien bee caused even more ghosting than I had without! When trying to freeze something like a hummingbird, the most important thing is flash duration. Keep all the power dialed down as much as possible. Even 1/128 power if you can! In this case, we wanted plenty of coverage to really bring out all angles and sides of the bird. Side lighting and backlighting, also provides separation from the background. The shutter only has to be set at your sync speed, and no faster! Some manual focus these shots, but I find the autofocus to work very well. Hummingbirds usually come into feed and then backoff a couple of inches from the feeder where they hover before going back in to feed. It is at this hover point where I will lock my focus and wait until they return to this postion before tripping the shutter. I must appologize for again not having the best example to show you, but I thought this was a fun experiement and now I know exactly where I want my improvements! Remember, you really need to watch any stray ambient light. Your exposure should be a nearly completely black frame without your flashes going off. Ambient light will cause ghosting. Set your shutter to near sync, and find an f stop that will kill this light. Position your lights, meter them, and wait! Below is my panorama of a hummingbird sequence. It is composed of 3 separate exposures. Next year, I will try and nail it in one. Don’t know if it’s possible but, I am sure gonna try!

Hummingbirdsequence_Panorama1-2-2

Studio Problem Solving

Posted in Behind The Scenes, Photography with tags , , , , , , , , , , on September 11, 2009 by craigproulx

20090813-watch-0985-webSomtimes when working with lighting, we reach a wall.  This product shoot involving a watch is a perfect example.  I was shooting this watch for my stock/commercial portfolio.  I shot it on black plexi-glass to utilize the reflection of the watch as part of the composition.  A simple monolight in a softbox and some fill and black cards made up the ingredients for this recipe.  A canon EOS 40d on a tripod, with a 150mm lens completed it.  I finally got the right combination of highlights and shadows that I wanted by manipulating the two cards.  The black card I used the control the reflection of the softbox and other stray highlights that were hitting the highly reflective black plexiglass.  The white card gave me just enough fill. 

Now for the challenge.  This watch happens to glow in the dark.  I wanted to get a shot of nicely lit watch with the face glowing. 

Ok, so first I need to get the watch to glow.  I pulled out my favorite tool:  the multiple exposure!  I knew I already had the original shot in the bag, so I simply shut off my studio room lights, and shot the exact same composition and angle exposing for the glow in the dark faceplate.  Pretty simple.  Later I would just brush it in using layers in photoshop.

Now I realized I had another issue.  I am so glad I realized this at the time an not when I got in photoshop and had the whole set broken down already.  The issue at hand was the glare on the watch’s glass face I was getting from the camera angle I was at.  In my original shot, it wasn’t a big deal.  The glare was manageable and I feel it didn’t distract to much from the watch itself.  In the case of the glow in the dark watch, it really would have hindered the effect.  I knew if I changed the camera angle, relative to the watch, it would solve the problem, however it would not work well trying to merge the two copies in photoshop.  I could maybe move the light around and fix the glare, but then the face would not be lit like I wanted and most importantly the same way the first exposure was.  So what did I do?  Pulled out a circular polarizer, screwed it on the lens, and rotated it until most of the harshess in the glare was gone.  I could tell when to stop rotating, by watching the reflecting of the whole watch on the plexiglass disappear.  So in the glow in the dark image you see below, I used a total of 3 separate exposures to create a glare free, glow in the dark, studio shot of a watch.  I haven’t been doing a lot of landscape photos lately, but it is a good thing I had that polarizer in my bag.  It saved me a lot of time in photoshop in the end.

20090813-watch-0985-web-Edit

Why I love, but hate Canon right now!

Posted in Personal, Photography with tags , , , , on August 21, 2009 by craigproulx

Let me first start by saying, that I am not one to usually get involved with the rant about what is going to be the latest and greatest camera to come out on the market.  I must confess however, I do read these rants because I find them quite amusing.  The thing really pisses me off is how much these camera companies are ripping off consumers.  


It all started a few days ago when Canon announced their upgrade to the popular advanced compact camera the G10.  I, myself have not even had my camera for a year and all of a sudden…G11!?  I could post a photo here on my blog, but I refuse to give into the advertising of this camera!  I don’t want to sound piggheaded, it sounds like a great camera.  Basically, Canon decided to keep the same camera body, and simply lower the megapixel count.  By keeping the same Digic 4 processor, the new G11, promises better low light, low noise, functionality at higher ISO’s.  That’s the other thing that pisses me off!  I love the G10, but honestly, I don’t use this camera above ISO400.  This is fine by me, because the reason why I bought the camera in the first place was to have  a small, compact camera to take snapshots and for creative “on the go” oppurtunities.  So in my opinion, the camera serves me just fine.  But, why the the hell put these ridiculous ISO 1600’s and 3200’s on a compact, when they are absolutely unusable?  It’s almost as if they put it in there for the spec value only.  Now, don’t get me wrong, Canon has an excellent idea about the megpixel count.  In fact, I have never been impressed my megapixels, and would take a camera that has better low light quality over resolution any day!  In the case of the G10, I want the megapixels though.  I find myself constantly using this camera as a macro camera and always cropping in on certain things.  The 15 megpixels that is has allows me to do that.  That being said, I would not trade in my G10 for a G11 anyday of the week.  Where the frustration comes from my part, is the feeling that Canon is releasing these camera’s, knowing that their performance might be suffering because of higher megapixel count, with full intention of replacing them within the same year!  Again, I might be satisfied with my camera, but I can tell you that a lot of consumers are not going to be happy about this.  The G10 is a $500.00 compact camera.  Now comes the G11 with features some consumers might be attracted to for get this…the same fricken price as the G10 is selling for:  $500.00.  And all within a year’s time.  I don’t want for this rant to sound like I am switching from Canon.  They make an unbelievable product.  I am completely satisfied with my G10, 40D, and Rebel.  In fact, I wish Canon didn’t take the 40D off the market, because with all the portrait and wedding work I have coming up, I want another 40D.  But come on guys?  Put your money into a good product and leave it there.  Don’t try and fix what isn’t broken!  With the way the economy is, hard working people are forking over hard earned $$ and they don’t want to be hearing of their camera being obsolete 6 months after they walk out of the store with it.  It just isn’t a good feeling for any consumer.  Slow down, keep the camera’s you have, and here’s an idea…Maybe put it into some lenses which haven’t been upgrade in the last 10 years?  Now there’s a thought!  

Canon G10 in the studio.

Canon G10 in the studio.

The Bogen “Magic Arm”, it’s better than buying that new expensive camera!

Posted in Behind The Scenes, Photography with tags , , , , , , , , , , , , , on August 14, 2009 by craigproulx

Bogen-blogWe all dream of getting that camera which we think will completely revolutionize the way we take pictures.  You know the one.  It might be a full frame for some of us.  For others, it might be that 10 frame a sec machine that would enable us to capture that bird we have been after for months now.  I must thank some of the photographers out there who made me think differently about accessories.  Guys like Joe Mcnally use these things daily and the fact of the matter is, these accessories will allow you to create not only better photos, but different photos.  Show me a camera that out of the box, you can fasten to the side of a moving car!  That $8,000 DSRL might be nice, but you need something else to put that $8,000 DSLR in a place that will give you a truely different perspective.  I am talking about GRIP EQUIPMENT! 

I like to shoot a lot of creative type stock images for both my portfolio and hopefully for someone to pickup on the “micro stock market”.  It might pay pennies, but the reason why I shoot this stuff is for the pure fun and creativity that is involved.  One of the many aspects I love using in my images is motion.  Conveying motion is not a difficult aspect, but is one that can easily be captured in camera, without engineering it in photoshop.  Below is an image concept I borrowed and expanded on.  I wanted to make an image conveying the extreme sense of waste that americans have nowadays with money.  By taking a Bogen Magic Arm, fitted with a super clamp, I was able to mount my DSLR, a canon 40d, onto a corn broom handle. 

This stock image of a broom sweeping cash, couldn't have been possible to pull off in camera without the magic arm.

This stock image of a broom sweeping cash, couldn't have been possible to pull off in camera without the magic arm.

The bogen magic arm features multiple ball bearing joints that allow you to adjust and position anything from a flash to a camera.  The unit is rated to hold the weight of a DSLR.  There are 2 types.  One has a friction arm so that you can fine tune the position of your camera or flash, similar to the friction balheads used on tripods.  The one I use, locks into place solid.  I prefer this one, because I know it will not vibrate loose and move on me.   Since the end plate is equipped with 1/4″ or 3/8″ lighting studs, attaching a tripod plate is easy!  If you want to mount a flash, simply screw on one of the hotshoe mounts that come with your standard umbrella lightstand mounts.


This is how I attached my camera to the broom handle.

This is how I attached my camera to the broom handle.

Sometimes you need to put a speedlight in a place that is just not feasible for a lightstand.  How about a shower?!  Below is the setup image for an image I made in a shower.
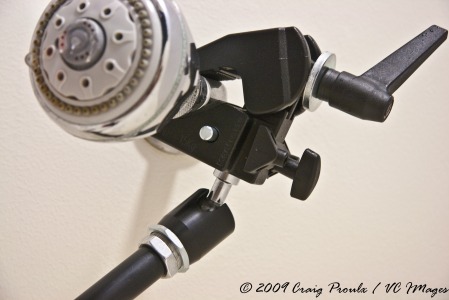
This shows the super clamp and how easily it can be fastened to a shower head!

This shows the super clamp and how easily it can be fastened to a shower head!


Why would I want to put a speedlight in a shower you ask?

How else do you back light a subject while taking a shower?

How else do you back light a subject while taking a shower?

The image below shows the mounting system of a speedlight to the magic arm.  The amazing thing is, all three joints are locked by 1 lever.

A simple hotshoe mount from an umbrella mount is all you need to mount a speedlight to the magic arm.

A simple hotshoe mount from an umbrella mount is all you need to mount a speedlight to the magic arm.

Off To Ossipee!

Posted in Personal, Photography with tags , , , , , , , , on August 11, 2009 by craigproulx

20090808-IMG_0887Friday, I decided to take a day off for a change and head up to our friends Kelley and Dave’s camp.  It was in north Ossipee.  Ossipee is part of the Lakes region of New Hampshire, a popular destination for summer vacations.  Their RV was located on a nice seasonal lot at Danforth Bay.  Danforth Bay has both RV’s and small cottages (they are actually fully furnished houses).  I have been traveling fairly lightly lately as far as camera gear goes when we travel.  Between shooting portraits, weddings, and working on the never ending commercial portfolio, the last thing I have been wanting to do is lug around a heavy DSLR and lens.  I have been lucky to find everything I need in the G10.  I can make simple snapshots into decent images with extreme ease.  I can shoot RAW when I want, and with the 14 megapixels, I know that if I have to crop in later, so be it!  Well, I promised myself and Courtney that I wouldn’t be shooting photos the entire weekend, so I stuck to toying around when she was enjoying a book on the porch.  I wanted to make some motion abstracts, which I haven’t had the oppurtunity to do in a while.  Just when I though my little compact would give me a hard time, it spit out exactly what I was looking for:

20090808-IMG_0878

here’s another giving her a little twist:

20090808-IMG_0880


Being the sucker for a good closeup, I couldn’t resist:


20090808-IMG_0888


The next day we decided to drive up to North Conway, home to the outlets, and Cathedral Ledge, a popular rock climbing spot.  We took the lazy way up (car to the top), and were greated by a breath taking view. 


20090808-IMG_0903

Looking over the edge gave me a little vertigo!  What was more impressive was seeing human beings climbing over the top of this shear verticle drop.  If I had to guess I would say that the drop was well over a hundred and fifty feet.


20090808-IMG_0915

Not just one, but several climbers were beneath this guy.  What a big responsibility he has!  He tied off to the saftey fence post at the top and belayed the rest of the climbers that followed.


20090808-IMG_0919

Finally, who could pass up this beautiful backdrop?  Portrait time!


20090808-IMG_0912

Babies Babies and More Babies!

Posted in Photography with tags , , , , , , , on July 21, 2009 by craigproulx
Up Close and Personal!

Up Close and Personal!

I don’t do a lot of baby portraits, but when I do, I must say that I am very lucky because the little ones seem to be just drawn to me and the camera.  This series of images is from a recent session with three different babies.  I was blessed to shoot in one of my favorite locations, a cottage that by itself, is a nice little portrait studio.  It features white walls, ceilings, and gorgeous light at almost anytime of day.  No need to setup lights.  I simply just bounce the flash and drag the shutter to get a nice soft, flat, light.  The ambient build up quite nicely and works as a great rims light if positioned correctly.  This little girl just loved the camera.  I was down at floor level, and just let her crawl towards me.  I was amazed at how close she got!  I had a 24-70 lens on a 40d body.  I know it is a goofy shot, but the awkward head size and expression sold me.  Normally, I shoot RAW.  In this situation, the lighting was so consistant and simple, I decided to shoot JPEG’s to save space on my cards.  I personally, love my images to jump with color right from the camera.  My simple way of doing this is by using the built in profiles that the camera has called “Picture Styles”.  I always leave my camera set on “landscape” as it gives me a nice combination of sharpness, and saturation, right out of camera.  I always try and go for warm, colorful skin tones, but always try to keep them somewhat in line.  I also, usually set my kelvin in camera to warm up the flash a little.  The next two images were shot using a 70-200 IS lens.  I was able to back up a little and throw the background out of focus.  To sum up all of this, when you are blessed with decent light, keep it simple and use your surroundings.  They can be walls, ceilings, or floors.Blog-6415   


 20090713-IMG_6033-Edit-2

I sunk my G10! Dropped it into the pool!

Posted in Photography with tags , , , , , , , , , , on July 10, 2009 by craigproulx
From the deep end!

From the deep end!

What do you think I am crazy?  Well, maybe a little!  Actually this past weekend, I took advantage of the nice, warm, weather and decided to test out the an underwater housing for the Canon G10.  It has been raining for what has seemed like months here in New England.  In fact, one day I swore I saw a big wooden arc float by loaded with animals!  I have never considered myself a risk taker.  I hate gambling and never buy scratch tickets, so putting a $500 point and shoot camera in the pool made me kind of nervous.  After pulling this housing out of it’s box, the first step was to do a dry test to check for leaks.  The manual that comes with the thing tells you to submerge it in 5 inches of water for 4 minutes.  Did I mention that I love my camera?  That test is not enough to make me comfortable!  I decided to attach a diving weight to the plastic contraption with a ribbon and threw it in the deep end of the pool for an hour.  So 5 inches turned into twelve feet, and 4 minutes turned into 60!  That is just how my mind works!  When I pulled it up it was bone dry inside.  The case did it’s job!  Now for the fun!  The camera sits snuggly inside of this little housing.  If none of you have seen this marvel of engineering here is a photo from B&H’s website:


Canon G10 Underwater HousingIt really is amazing how all these little knobs and buttons line up with the real controls on the camera!  You really have full control over the camera and there is nothing that you cannot do while it is inside this housing.  To make sure the sealing ring gasket stays in tact and maintains a seal, it is important to grease it up before each use.  My only complaint is that it is difficult to see when you are in bright sunlight shooting with it, and the case cripples the viewfinder on the G10 because of it’s size.  It is something that definately takes some getting used to.  I ended up using the camera on an automatic setting because I was not happy with the blue cast created by the water, and the “Underwater” setting provides a nice neautral white balance.  I originally got this thing to take pictures while snorkeling in the carribean.  Towards the surface there should be plenty of light, eliminating the need for me to drag a strobe around.  My test photos proved that there was ample light.  Most of the shots were exposed at ISO 80!  Who knows I might even have to use the built in ND filter in the G10!  Well, it’s off to the beach for the next week!  I am hoping to be doing some commercial type images with models on the beach, in the arcade, and maybe even catch some fireworks!  Or then again…maybe I will just relax!
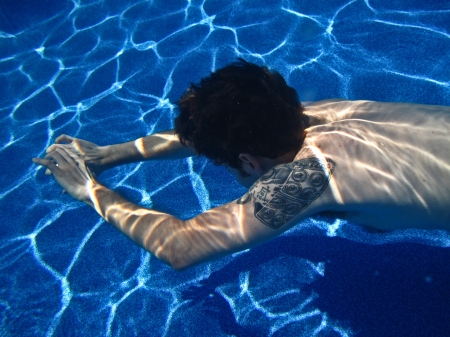
Jeff swimming below.

Jeff swimming below.

Creating My Own Sunlight!

Posted in Photography with tags , , , , , , , , , , , , , , , on June 30, 2009 by craigproulx

orangesplash-web-5226, originally uploaded by craig.proulx.

I have wanted to do a set of the typical fruit splashing into water type shot for my commercial portfolio and to sell as a stock photo for quite a while now. Originally this was supposed to be shot outside on a birght sunny day when the sun was high in the sky. You think it would have been a much simpler setup, having no lights to setup, just the sun. I soon realized that factors such as the wind, and not being able to see the damn LCD screen on the back of the camera was just to overbearing for me to take. After about 500 images taken that day, I was not satisfied. I got nothing useable.

Then I though…”Why not make my own sun?”. Don’t get me wrong I am a big fan of natural light and doing things as simple as possible. For this type of shot however, a controled lightsource and environment is what I was going for. Off to the studio it is! I used the same concept but instead of using the sun as my main light, I used an alien bee 800 studio head above, and added a backlight to pop the detail in the orange. I then decided to add a third light as a kicker on to the left of the orange. I purposely kept the speedlights and the alien bee turned down on low power for not only the recycle time, but for the fast flash duration. It would be that quick duration that would freeze the motion that I was after. The whole thing was setup on a silver reflector to bounce light back up into the fruit and water. All the bubbles were created by dropping the orange slice into sparkling water. I used “Perrier” although, I know you can grab cheaper stuff at the grocery store. I knew I wanted a nice complimentary color to go with the orange so I chose green. I simply, scotch taped some green construction paper around the glass vase that I dropped the orange into.


IMG_9579

The beauty of lighting this whole thing in the studio, was there was no wind, and I could use a 580EX set to master to pop both the slave flashes and the alien bee! No sync cords required. I keep trying to see what I can pull off without PocketWizards, but I do know that someday I am going to have to cave in and buy some. For now, mostly everything I do is done with the Canon wireless system. I prefer to use my speedlights on manual, because I can lock in their output and it won’t change due to ETTL. With a camera like the 40D, I can do right into the menu and tell each flash what to fire at. SO COOL! I cannot stress enough what a relief it was when I finally figured this out.

So, if your trying to shoot something and the sun isn’t cooperating or it’s too damn windy, just take it inside and make your own sun! Ok, so maybe this wouldn’t always work, but it is worth a try!

Craig

Keeping the creativity flowing!!!

Posted in Photography with tags , , , , , , , on June 26, 2009 by craigproulx

purse-web-0431, originally uploaded by craig.proulx.

Lately I have found myself creating more images on the fly. I lot of my stuff usually requires the need to setup lights, experiment with camera angles, and occasionally compositing images together. Because, I have been so busy lately with family things, I have been more opt to take along my compact camera. I think I have finally crossed the threshold where I am comfortable not lugging around a 400 pound camera and lens!

There are so many photo opps everywhere! In church, at restaurants. Even everyday things you take with you such as this purse! In fact, we where on our way to a restaurant for lunch, when we stopped to get gas. My lovely girlfriend’s purse was sitting on the floor. I picked it up and angled it by the car window so that some light poured on it. A very simple shot. I fired off a bunch of frames, trying different angles and compositions I liked. I might not have taken 20 minutes to setup for this, like I would in my studio, but it works. Whether or not I use it for anything dosen’t matter. The point is it sparked some creativity when my mind would normally be in lala land thinking of something else. In fact that day which was a weekend I walked away with close to 10 images that I am indeed going to use in my portfolio. They were all taken with a compact camera! I have to thank people like David Hobby and Chase Jarvis for doing things like daily I Phone photos for really inpiring me and showing what can be done with everyday activities!

The next photo was taken while at work at a university. The guy with me thought I was nuts! The very first time I had used this bathroom, I knew I had an image. I could see it, but just had to refine it and figure out how to manipulate it in camera and in post to get what I was seeing. When I was done, I can’t even begin to describe to you how nice it felt to have been productive in an environment which wasn’t a glamourous one! The lesson here: Always bring your compact and take it out when you normally wouldn’t! It might surprise you!


3584537413_82eca42600